


Overview
Online forms have a multitude of uses. Their basic function is to collect information. Most often they are used for registrations or billing purposes. You fill out a form whenever you sign up for a website’s service such as Gmail or Yahoo as well as when you make online purchases. Forms can be created in different ways. This site will tell you how to create a form using Microsoft Word and Adobe Acrobat.
Steps
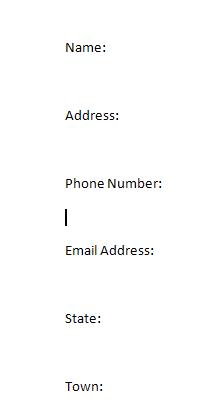
1. To begin, open a blank word file and list the fields you would like to collect information about (name, address, phone number, email address, credit card number, etc.).
2.
Separate each line with a double space to make it look more professional. Once you have all of your designated fields your Word file should look like this:
* Keep in mind you can create a drop down selection bar in Acrobat, like you would see when choosing your title on a registration page (Mr. Mrs. Sr. etc).
3.
Save your word document and go to print. Where you select a printer, choose Adobe PDF. This won’t print your file, but it will save it as a .PDF file.
4.
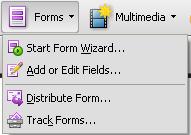
Adobe Acrobat will open. You will see your word document in front of you but it will not have editable fields. At the top of your screen you will see a menu called Forms. Clicking that will provide a drop menu. Click “Add or Edit Fields.”
5. A message will appear asking you if you want Adobe to automatically detect form fields. Click no this will enable you to design the form at your will.
6.
The form editor will open up in Acrobat. You will see the ruler grid across the top and down the left side of your page. At the top left there is a button that says “Add New Field,” click this and yet another drop down menu appears.
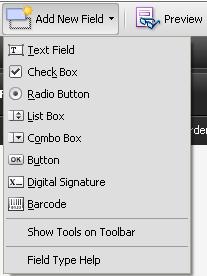
7. Click “Text Field” and now you can place a text box anywhere on your page. Place it next to “Name:” and you can label the text box “Name” as well. *Labeling the box will help you when organizing information gathered. Hit enter and then double click the text box. Its properties will open. Here you can change how the text box will behave, its font, font size, and font color. Underneath options you can change the text’s alignment, make the box multi-line, scrolling text, and limit the number of characters a person can use in that box.
8.
To create a drop down menu, select the combo box from the fields. Click into the combo box’s properties. Underneath the options tab there is a spot for “Items.” Add whatever text you would like to be selectable by your viewers and click “Add.” You may input a spacebar and click “Add” to have a choice for a blank answer.
9.
Once you have completed your form you can distribute it through e-mail or post it on your website. To distribute it through e-mail, click distribute form at the top right of Acrobat. From this point on you will need an Adobe account. They are free to make and are quick to activate. Sign into your account through the wizard in Acrobat. Type in the e-mail addresses of your recipients, separating each one with a comma, then click “Send.” A message will come up saying there are no aliases for the addresses. This occurs because you are not using an Outlook E-mail account. Just click “Ok” and your form will still be sent.
![]()
10. To distribute your form by putting it on your site, insert a hyperlink and connect the link to where your .PDF is saved. Type in the text that you would like your visitors to click on (like saying click HERE). Now whenever someone clicks on that link they will be brought to the same distributed .PDF as if you e-mailed it to them.
11.
After distributing your form, you will have to wait for responses. To do this, open the Tracker. It can be accessed from Adobe Acrobat -> Forms -> Track Forms. This will open a window that allows you to check on any distributed forms (every form is saved to your Adobe account). Click on “View Responses” and click “Get Started.” Here you will see a list of all of your responses. They will be organized by how you labeled your text fields, combo boxes, etc. If you named the text field in front of “Name:” “name” then you will see how each recipient responded to that field.

Congratulations you are now knowledgeable in creating forms!
